Nano Banana Prompt Guide: Examples and Best Practices
How To, Insights | Published on | Last updated on
14 min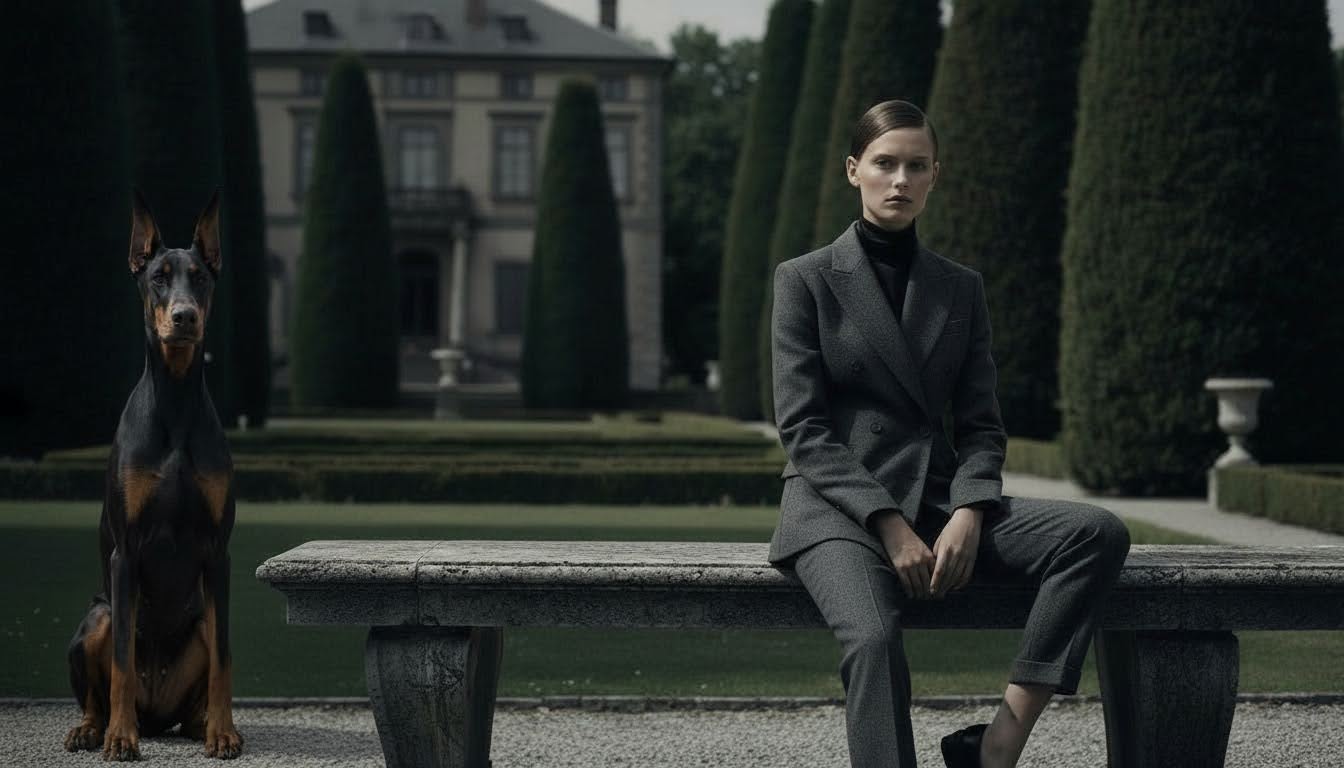
The Nano Banana family — Nano Banana 2, Nano Banana 2 Lite, and Nano Banana Pro — spans fast image edits to reasoning-heavy 4K compositions, delivering professional-grade results across different creative needs.
However, the models are built differently, which means a specific prompting approach is often needed to reach their full potential. Nano Banana 2 and Nano Banana 2 Lite are designed for speed and pattern-matching (quick image generation and editing), while the Pro version focuses on structure and reasoning, allowing it to build complex scenes, data-heavy infographics, and intricate text rendering.
In this guide, we have put together a set of workflows to help you work with these distinct models. While we focus on the unique features of Nano Banana here, many of these techniques build on the same prompting essentials discussed in our foundational image prompting guide. Those core building blocks are helpful to know, but we wrote this Nano Banana prompting guide to stand on its own, so you can start reading right away.
Nano Banana vs. Nano Banana Pro
While they share a name, it is important to recognize that there are distinct Nano Banana models, each designed for different tasks. Nano Banana 2 (Gemini 3.1 Flash) and Nano Banana 2 Lite (Gemini 3.1 Flash-Lite) are built for high-speed editing and style transfers, while Nano Banana Pro (Gemini 3 Pro) is built for tasks requiring complex reasoning and high-fidelity output.
The following table highlights the most important distinctions between the fast models and the Pro model in the context of prompting:
Feature domain | Nano Banana 2 / 2 Lite (Flash) | Nano Banana Pro |
|---|---|---|
Primary role | Image editing, inpainting, and style transfer | Complex composition, text rendering, and infographics |
Prompting paradigm | Iterative and conversational instructions | Structured and detailed instructions |
Cognitive architecture | Rapid pattern-matching and mapping | Reasoning engine that plans scene logic |
Text rendering | Basic and prone to errors | High-fidelity and supports many languages |
Data grounding | Uses static training data | Uses active Google Search for real-time data |
How to Prompt Nano Banana 2 (Gemini 3.1 Flash)
Nano Banana 2 (Gemini 3.1 Flash) is designed for speed and high-velocity tasks, making it particularly effective for conversational editing and style transfers. Nano Banana 2 Lite (Gemini 3.1 Flash-Lite) is the faster, lighter option and follows the same prompting approach. Instead of building a scene from scratch using logical rules, Nano Banana looks at the pixels already there and predicts how they should change to match your description. This makes it a great choice for tasks where you want to modify an original image while keeping its overall look and feel.
Basic Image Generation and Styles
For standard image generation, Nano Banana works best with prompts that clearly define the subject, action, and context. While it can produce results from simple keywords, it thrives on descriptive, narrative-driven instructions that provide the model with a clear visual path. Here’s what you’ll need to include in your prompt to get the best results:
- Subject and action: State who or what is the focus and what they are doing.
- Contextual details: Provide “where” and “when” details, such as lighting conditions or background objects, to prevent the model from guessing.
- Stylization: Explicitly name your desired aesthetic, such as “photorealistic,” “watercolor illustration,” or “3D render,” to control the visual mood (check our AI art styles guide to learn the most popular styles).
Here’s an example prompt:
A high-fashion medium shot of a model in a charcoal grey tailored suit sitting on a slate stone bench in a formal garden. The monochromatic palette of grey and black is broken only by the lush, dark green of the manicured cypress trees in the background. The composition uses depth by placing a blurred stone statue in the foreground, the model in the middleground, and a distant villa in the background. Lighting: Rembrandt lighting with the key light placed high and to one side, creating a small triangle of light on the cheek for a moody, classic aesthetic.
Prompting for Image Editing
One of the most effective features of Nano Banana is its ability to perform semantic masking. Instead of manually painting over a specific area, you can use natural language to tell the model exactly what to change. The model identifies the target object based on your description and applies the edit while keeping the rest of the image intact.
Object Removal
To achieve a clean removal, use the “remove” verb and name the specific element(s) you want to remove. For best results, clearly describe the specific element you want to remove and ensure it’s easily recognizable. If you find that Nano Banana is changing other elements that you want to keep, mention explicitly that you want to keep everything else in the image the same.
Template prompt: Using this image, remove the [specific element]. Keep everything else in the image exactly the same, preserving the original style, lighting, and composition.
Example prompt: Using this image, remove the stone bust from the foreground to create a clean, unobstructed view of the model and the garden. Keep everything else in the image exactly the same, preserving the original style, lighting, and composition.
Object Addition
When adding elements, define both the new object and where it should be placed in the scene. For a more complex setup, it’s helpful to describe how the object should sit within the environment, such as its perspective or how it interacts with the existing lighting.
Template prompt: Using this image, add a [specific element] to the [location]. Ensure the new object matches the lighting and perspective of the original image.
Example prompt: Using this image, add a regal Doberman Pinscher sitting obediently on the gravel path to the far left of the image. Ensure the new object matches the lighting and perspective of the original image.
Object Replacement
Replacing an object is a combination of removal and addition (but done in a single step). To get predictable results, instruct the model to change only the specific element while requesting that the rest of the image (including the lighting, style, and surrounding details) remains unchanged.
Template prompt: Using this image, replace the [old element] with a [new element]. Keep everything else in the image exactly the same, preserving the original style, lighting, and composition.
Example prompt: Using this image, replace the stone bench with a sculptural, liquid-mercury-like flowing metal wave. Keep everything else in the image exactly the same, preserving the original style, lighting, and composition.
Style Transfer
Nano Banana can also be used to repaint an existing image in a different artistic style. This allows you to change the visual mood of the scene while preserving the original layout and subject matter. Follow this template prompt to get predictable results:
Template prompt: Change this image to [specific style]. Ensure the composition and the position of all objects remain exactly the same as the original.
Example prompt: Change this image to a sleek, minimalist futurism style with all organic textures replaced by smooth white polymer and chrome, using cool, sterile laboratory-white lighting. Ensure the composition and the position of all objects remain exactly the same as the original.
Prompting for Character Consistency
Maintaining a consistent character across different images is one of the most difficult tasks in AI generation. While it’s common to try using a specific set of descriptors (often called an “anchor string”) to define a character, this often results in the model creating a slightly different person or subject every time you change the scene.
The most reliable way to achieve consistency with Nano Banana is to build a 360-degree character sheet. This is a two-step process:
- Generate the reference sheet: First, generate 2-3 images of your character within a single frame or as separate generations. Instruct the model to show the character from multiple angles, such as looking left, looking right, and from the back. This provides the model with a complete visual understanding of the character’s features and clothing.
- Use references for new scenes: Once you have your character sheet, you can use those images as references to place that specific character in diverse situations. By pointing the model back to your original sheet, you ensure the proportions and details stay stable.
For example, imagine you are creating a four-shot AI storyboard for a luxury watch ad with the tagline, “The luxury of being first.” You would start by building your 360-degree character sheet:
Original image prompt: A studio portrait of a young woman, looking directly into the lens. She has a neutral, sophisticated expression. Her face has visible pores, subtle freckles, and natural skin grain. The lighting is soft and directional, highlighting her facial structure and the sharp tailoring of her charcoal grey suit.
Image editing prompt (2): Using this image, show the woman turned around so we see her back.
Image editing prompt (3): Using this image, make this woman look left.
Image editing prompt (4): Using this image, make this woman look right.
Next, using these images as references, you can prompt Nano Banana to place your subject in various contexts with different actions. Here’s how the four-shot AI storyboard for a luxury watch ad with the tagline “The luxury of being first” could look:
First shot prompt: A medium shot of this woman seated in the back seat of a high-end luxury vehicle, with a leather interior. She is looking intently at her watch, her head tilted down, showcasing her slicked-back hair and the clean line of her jaw. Outside the window, city lights are a motion blur of cool blues and whites (it’s early in the morning). Her skin is rendered with hyper-realistic detail, showing authentic skin grain and visible pores under the dim interior cabin lighting.
Second shot prompt: This woman standing on the raw concrete terrace of a minimalist lakeside villa at dawn, checking a luxury silver watch on her wrist. Her face is shown in a three-quarter profile with a focused, disciplined expression. Render with hyper-realistic skin details, including her specific freckles, visible pores, and natural skin grain. Soft, cool morning light, cinematic photography.
Third shot prompt: This woman in a close-up watching a lake at dawn. Her skin has details, including her specific freckles, visible pores, and natural skin grain. Soft, cool morning light, cinematic photography.
Fourth shot prompt: A close-up shot from behind this woman’s shoulder, focusing on her relaxed hand and watch as she stands by the lake. The water and trees are softly blurred in the background. Her skin shows visible pores and natural texture. Soft, cool morning light, cinematic photography.
How to Prompt Nano Banana Pro
Nano Banana Pro (Gemini 3 Pro) is designed for tasks that require complex reasoning, precise layouts, and high-fidelity text rendering. Unlike the standard model, which is better suited for conversational edits, Nano Banana Pro operates more like a designer, planning a scene’s logic before generating it. This makes it particularly effective for complex visual tasks.
Prompting for Infographics
Because of its “Deep Think” reasoning engine, Nano Banana Pro can handle structured data and hierarchical information. It is capable of rendering legible, correctly spelled text and organizing icons or charts into a logical flow.
To get good results, choose your prompt’s structure based on how you want the audience to read the information. Here are some helpful tips:
- For step-by-step guides: Request a process layout using an S-curve or zigzag pattern to guide the eye through a sequence.
- For modular topic overviews: Use a Bento grid, which is a layout that organizes different types of data into clean, rectangular compartments.
- For professional legibility: Specify that the design should include some white space (areas left clear of imagery or text) and a 3-level text hierarchy (headline, subheader, and body copy) to ensure the graphic is easy to scan.
- For data encoding: Use sequential palettes (colors that move from light to dark) to show magnitude or numbers, and qualitative palettes (distinct, different colors) for categorical groups like different departments or regions.
Let’s try an example using an S-curve pattern to guide the eye:
Create a professional process infographic showing ‘How to Brew the Perfect Espresso.’ Use an S-curve pattern to guide the eye from the top-left to the bottom-right. Include five steps, each with a small icon and a short label. Style the image with a ‘Mocha Mousse’ warm neutral palette for a high-end feel.
Prompting for Typography
Nano Banana Pro features state-of-the-art (SOTA) text rendering capabilities, making it the ideal choice for projects where typography is a central design element. Unlike standard models that treat text as an intricate texture of pixels rather than symbolic characters, Nano Banana Pro uses a reasoning engine to ensure high-fidelity, multilingual legibility.
Even with advanced models, text generation remains a technical challenge. To achieve professional results, follow these guidelines:
- Use double quotation marks: Enclose the exact string you want to render in double quotes (e.g., “The Luxury of Being First”) to signal to the model that the text should be treated literally.
- Prioritize brevity: Success is much higher with short phrases. For optimal results, limit text to a few words or sentences.
- Guide the font style: While the model supports SOTA rendering, use descriptive terms like “clean, bold sans-serif” or “elegant, traditional serif” rather than expecting it to replicate a specific, named font family perfectly.
- Define the hierarchy: Guide the viewer’s eye by specifying three distinct levels: a large Level 1 Headline, scanning-friendly Level 2 Subheaders, and legible Level 3 Body Copy.
Let’s look at an example that follows the guidelines above and serves at the same time as a visual guide to help you choose the right typographic tone:
Create a professional educational infographic titled “Choosing Your Typographic Tone.” Divide the layout into three horizontal sections, each representing a specific font personality:
Serif (The Traditionalist): Use an elegant serif font to label this section. Include a brief caption: “Authoritative and elegant; perfect for formal or classic designs.” Add a small icon of a quill or a classic book.
Sans-Serif (The Modernist): Use a clean, bold sans-serif font for the label. Include the caption: “Modern and tech-savvy; ideal for digital-first interfaces and clarity.” Add an icon of a smartphone or a geometric gear.
Monospace (The Technicalist): Use a fixed-width monospace font for the label. Include the caption: “Analytical and functional; best for technical schematics or code-inspired looks.” Add an icon of a terminal prompt or a circuit board.
Design Rules: Use a 3-level text hierarchy with a large Level 1 headline at the top. Allocate at least 30% of the canvas to white space to ensure a clean, professional look. Use a neutral color palette with bold accents for each section. Ensure all text is perfectly legible and correctly spelled.
For more useful tips, make sure to check the “Prompting for Images with Text” section in our foundational image prompting guide.
Prompting for Translations
One of Nano Banana Pro’s most powerful professional features is its ability to handle multilingual text rendering with high accuracy. Unlike other models that struggle with non-Latin characters, this model supports a wide range of global languages, making it a useful tool for localizing marketing materials, menus, and signage.
The model can generate text in one language and then translate it into another while preserving the original visual elements, lighting, and style of the image. This semantic translation ensures that your brand identity remains consistent across global campaigns. Use these tips for the best results:
- Keep it concise: Try to limit the translated text to reduce the risk of errors and maintain maximum legibility.
- Use structural guidance: When translating text on a specific object (like a product label or a street sign), describe the layout clearly so the model knows exactly where to swap the text strings.
- Use reasoning: Because it is built on Gemini 3 Pro, the model understands the cultural context of the text it is rendering, which helps in choosing appropriate font styles for different languages.
- Verify with a native speaker: If you are using the output for professional content, it’s always good practice to have a native speaker double-check the translation for accuracy and cultural nuance.
Template prompt: Using this image, translate the text on the [specific object] into [target language]. Keep everything else in the image exactly the same, preserving the original style, lighting, and textures.
Example prompt: Using this image, translate the text on the sign-up page into Italian. Keep everything else in the image exactly the same, preserving the original style, lighting, and textures.
The image on the left is the original one.
More Nano Banana Prompting Tips
While specialized tasks like infographics and character consistency have their own workflows, there are several advanced features across the Nano Banana models that can elevate your professional output.
Using Video References with Nano Banana 2
Nano Banana 2 now accepts video references alongside image references, so you can point the model at a clip to guide the subject, style, or setting of a generation or edit.
- Guide with motion context: Attach a video reference the same way you add image references, and state in your prompt what the model should take from it (the subject, the style, or the setting).
- Combine with image references: Mix video and image references to lock in a subject while borrowing the look of your footage.
Using Live Google Search Results
Nano Banana Pro integrates directly with Google Search to ground its generations in real-world facts. This is a game-changer for projects where accuracy is mandatory, such as maps, historical scenes, or technical data. Here’s a quick guide:
- Factual accuracy: Use the “Thinking” model when you need to visualize data or events that require up-to-date information.
- Real-time context: You can prompt for current weather conditions, specific landmarks, or verified historical details, and the model will verify these facts before rendering.
- Example prompt: “Use Google Search to check the current weather in Sydney, Australia, and add weather information on top of a cinematic landscape photo of the Sydney Opera House.”
Note: This live Google Search integration is a unique feature of Gemini 3 Pro, and you can try it in the Gemini app for now.
Image Mixing and Multi-Reference Logic
One of the most powerful Nano Banana features is the ability to use multiple reference images to construct a new scene. This allows you to combine discrete elements like a specific garment and a specific person. Follow these guidelines for best results:
- Style and subject fusion: You can upload an image of a specific model and an image of a specific dress, then prompt the model to “put this dress on this model”.
- Control layers: Use the reference images to dictate different parts of the output, such as using one image for the facial features of the subject and another for the pose.
- Example prompt: “Using Reference Image 1 (the model) and Reference Image 2 (the silk gown), generate a high-end fashion shot of the model wearing the gown. Ensure the silk texture and the model’s facial features are preserved exactly.”
Scaling to 4K for Production-Ready Quality
While standard models are often capped at lower resolutions, Nano Banana Pro supports native 2K and 4K outputs. Here are a few tips:
- Micro-textures: Use 4K for shots where fine details matter (like the grain of “brushed steel” or individual threads in a 200-thread weave fabric).
- Print and presentation: High-resolution output ensures your visuals remain sharp for large-scale marketing campaigns or high-end digital publishing.
- Example prompt: “A high-end product shot of a luxury watch in ultra-detailed 4K resolution. Focus on the ‘brushed steel’ micro-textures of the bezel and the intricate internal gears visible through the glass.”
On Leonardo.Ai, you don’t need to specify the resolution in your prompt. You can simply select it from the panel on the left:
Prompting with Purpose and Method
Nano Banana and Nano Banana Pro are state-of-the-art models designed to deliver high-quality, professional results. However, while the foundations of image prompting remain relevant, these models require a specialized approach to truly excel.
We hope this blog has equipped you with the techniques needed to master these specific approaches so you can start seeing better, more accurate results in your creative work.On Leonardo.Ai, you can easily switch between Nano Banana and Nano Banana Pro, as well as other popular models like GPT Image 1.5, Flux 2 Pro, Lucid Origin, etc. We can’t wait to see what you build next!
RelatedArticles
How to Add AI Music and Voiceovers to Your Videos
Silent AI videos lose viewers fast. Here are three ways to add sound in Leonardo.Ai — video models with native synced audio, custom soundtracks with Music v1, and AI voiceover with Seed Audio 1.0 — plus a step-by-step walkthrough.
remove.bg API is Moving to Leonardo.Ai
remove.bg's background removal API has joined Leonardo.Ai, also part of Canva. Everything you do today with the remove.bg API, you can do on Leonardo, plus upscaling, scene generation, and more.
The 6 Best Google Flow Alternatives to Try (Free & Paid)
Google Flow puts Veo 3.1 in a slick AI filmmaking studio, but its credit system is steep, allowances don't stretch far, and you're limited to Google's own models. Here are the six best Google Flow alternatives, including options that offer Veo itself alongside the rest of the latest state of the art video models.
ImagineArt vs Leonardo.Ai: Features, Price & Performance Compared
ImagineArt and Leonardo.Ai look similar at first glance: both put a collection of AI image and video models behind one interface. The differences show up in what surrounds those models — creative control, editing workflow, 3D and audio generation, team features, and pricing. Here's how the two platforms actually compare.